You can access several User Menu functions from the keypad. Enter your user code to display the functions you have access to. The User Menu allows you to manage user codes, user groups, Z-Wave device favorites, and more.
Below are the User Menu functions and processes as they are displayed on the keypad.
Alarm Silence
Alarm silence turns off your bells and sirens when your system is in alarm. It does not stop a report from being sent to the emergency monitoring station.
Silence an Alarm:
-
Press CMD until MENU? NO YES displays.
-
Select YES.
-
Enter your user code and press CMD.
-
At ALARM SILENCE?, press any select key or area to silence the bells or sirens.
Zone Activity Check
-
Press CMD until MENU? NO YES displays.
-
Select YES.
-
Enter your user code and press CMD.
-
Press CMD until ACTIVITY CHECK? displays.
-
Press any select key or area. The keypad displays ENABLE? YES NO. The default is YES.
-
When NO is selected, the keypad displays CHECK DISABLED for four seconds, then sends the Activity Check Disabled message to the monitoring center.
-
When YES is selected, the keypad displays CHECK ENABLED for four seconds, then sends the Activity Check Enabled message to the monitoring center.
-
Sensor Reset
A sensor reset allows you to reset panic and fire sensors to ensure they can detect any additional alarm conditions. A sensor reset is required after sensors have been tripped and after replacing batteries in wireless devices.
Reset All Sensors
-
Press CMD until MENU? NO YES displays.
-
Select YES.
-
Enter your user code and press CMD.
-
Press CMD until SENSOR RESET? displays.
-
Press a top row select key or area. The keypad displays SENSORS OFF followed by SENSORS ON.
Lockdown
Activate a lockdown to immediately lock all public doors connected to your system. Deactivate a lockdown by allowing an authorized user to perform a sensor reset at the keypad.
Activate a Lockdown
-
Press CMD until MENU? NO YES displays.
-
Select YES.
-
Enter your user code and press CMD.
-
Press CMD until LOCKDOWN? displays.
-
Press any select key or area to lock all public doors.
Deactivate a Lockdown
If Sensor Reset and Lockdown Override are enabled in your profile:
-
Press CMD until MENU? NO YES displays.
-
Select YES.
-
Enter your user code and press CMD.
-
Press CMD until SENSOR RESET? displays.
-
Press a top row select key or area. The keypad displays SENSORS OFF followed by SENSORS ON, returning all public doors back to their previous state.
Door Lock/Unlock
Lock or Unlock Your Doors
-
Press CMD until MENU? NO YES displays.
-
Select YES.
-
Enter your user code and press CMD.
-
Press CMD until DOOR LOCK/UNLOCK? displays.
-
Press a top row select key or area. Enter the door number and press CMD or select LIST to browse doors.
-
Press the select key or area over the desired option.
Door Access
Door access is granted when an authorized credential is presented to a door access reader. The door momentarily unlocks, allowing the user to enter, then re-locks.
Enable Door Access:
-
Press CMD until MENU? NO YES displays.
-
Select YES.
-
Enter your user code and press CMD.
-
Press CMD until DOOR ACCESS? displays.
-
Press any select key or area to allow momentary access.
Armed Areas
Use this function to view your system’s currently armed areas.
Display Armed Areas
-
Press CMD until MENU? NO YES displays.
-
Select YES.
-
Enter your user code and press CMD.
-
Press CMD until ARMED AREAS? displays.
-
Press any select key or area. Press CMD to advance through the list of armed areas.
Outputs On/Off
Use this function to individually turn your system’s outputs on and off. Your system may use outputs to control door access, interior and exterior lighting, heating, air conditioning, and other appliances.
Turn Outputs On and Off
-
Press CMD until MENU? NO YES displays.
-
Select YES.
-
Enter your user code and press CMD.
-
Press CMD until OUTPUTS ON/OFF displays.
-
Press any select key or area.
-
Enter the output number, then select ON or OFF.
Z-Wave Setup
Z-Wave technology adds home automation to your system. With Z-Wave, you can control lights, locks, small appliances, and thermostats from your keypad, Virtual Keypad App, or VirtualKeypad.com. You can add up to 140 Z-Wave devices to your system.
Note: To access favorites on 7-Inch Touchscreen Keypads, press Favorite or the Z-Wave device in the Carousel menu. Press the Settings icon in the bottom right corner to configure device settings.
Add a Z-Wave Device
-
Press CMD until MENU? NO YES displays.
-
Select YES.
-
Enter your user code and press CMD.
-
Press CMD until ZWAVE SETUP? displays.
-
Press any select key or area. The keypad displays ADD LIST REMOVE.
-
Select ADD.
-
Press the button on the Z-Wave device when PRESS BUTTON ON DEVICE TO ADD displays on the keypad.
-
Press CMD when DEVICE FOUND displays.
-
Press any top row select key or area and name the device.
-
Press CMD to save the device.
List Z-Wave Devices
-
Press CMD until MENU? NO YES displays.
-
Select YES.
-
Enter your user code and press CMD.
-
Press CMD until ZWAVE SETUP? displays.
-
Press any select key or area. The keypad displays ADD LIST REMOVE.
-
Select LIST and DEVICE LIST displays.
-
Press CMD to advance through the list of Z-Wave devices.
-
Press any select key or area to display DEVICE RENAME STATUS.
-
Select RENAME, name the device, then press CMD.
Remove a Z-Wave Device
-
Press CMD until MENU? NO YES displays.
-
Select YES.
-
Enter your user code and press CMD.
-
Press CMD until ZWAVE SETUP? displays.
-
Press any select key or area. The keypad displays ADD LIST REMOVE.
-
Select REMOVE.
-
Press the button on the Z-Wave device when PRESS BUTTON ON DEVICE TO REMOVE displays on the keypad.
Status of a Z-Wave Device
-
Press CMD until MENU? NO YES displays.
-
Select YES.
-
Enter your user code and press CMD.
-
Press CMD until ZWAVE SETUP? displays.
-
Press any select key or area. The keypad displays ADD LIST REMOVE.
-
Select LIST. DEVICE LIST displays.
-
Press CMD to advance through the list of Z-Wave devices.
-
Press any select key or area to display DEVICE RENAME STATUS.
-
Select STATUS. The device name and OKAY display when the device communicates. The device name and FAILED display if the device stored in the system does not communicate.
-
Press CMD. REMOVE FAILED DEVICE displays.
-
Select YES to remove the failed device from your system. Select NO to leave the device in your system.
Transfer Controller Operation
Use this function to transfer and replace your existing Z-Wave device information with information from another system.
-
Press CMD until MENU? NO YES displays.
-
Select YES.
-
Enter your user code and press CMD.
-
Press CMD until ZWAVE SETUP? displays.
-
Press any select key or area. The keypad displays ADD LIST REMOVE. Press CMD to display FAV XFER OPT.
-
Select XFER. The keypad warns you that transferring Z-Wave device information deletes all your Z-Wave devices connected to your system.
-
Select YES to proceed.
-
Initiate the transfer at the other manufacturer’s Z-Wave portable controller. ZWAVE SETUP? displays.
Optimize Z-Wave Devices
-
Press CMD until MENU? NO YES displays.
-
Select YES.
-
Enter your user code and press CMD.
-
Press CMD until ZWAVE SETUP? displays.
-
Press any select key or area. The keypad displays ADD LIST REMOVE. Press CMD to display FAV XFER OPT.
-
Select OPT. The keypad displays OPTIMIZE SUCCESS when communication with a Z-Wave device is established.
Favorites
Favorites are preset combinations that allow you to quickly activate multiple Z-Wave devices at once. For example, you can create a favorite that turns down your thermostat, turns off your lights, and locks your front door when you leave the building. You can add up to 25 devices to a favorite.
Note: To access favorites on 7-Inch Touchscreen Keypads, press Favorite or the Z-Wave device in the Carousel menu. Press the Settings icon in the bottom right corner to configure device settings.
Add Devices to a Favorite
-
Press CMD until MENU? NO YES displays.
-
Select YES.
-
Enter your user code and press CMD.
-
Press CMD until ZWAVE SETUP? displays.
-
Press any select key or area. The keypad displays ADD LIST REMOVE. Press CMD to display FAV XFER OPT.
-
Select FAV. At FAVORITE NUMBER:, enter a number between 1 and 20 and press CMD. ADD EDIT REMOVE displays.
-
Select ADD.
-
Press CMD to browse your Z-Wave devices.
-
Press any select key or area to assign a device to a Favorite.
Edit Devices in a Favorite
-
Press CMD until MENU? NO YES displays.
-
Select YES.
-
Enter your user code and press CMD.
-
Press CMD until ZWAVE SETUP? displays.
-
Press any select key or area. The keypad displays ADD LIST REMOVE. Press CMD to display FAV XFER OPT.
-
Select FAV. At FAVORITE NUMBER:, enter a number between 1 and 20 and press CMD. ADD EDIT REMOVE displays.
-
Select EDIT.
-
Press CMD to browse your Z-Wave devices.
-
Press any select key or area to view a device’s settings. Refer to the Lights, Doors, and Thermostats to edit your devices.
Lights
Press the select key or area for the desired setting when SETTING: ON OFF DIM displays.
-
Select ON or OFF to turn a device on or off.
-
Select DIM, then enter the device’s dim level (1-10). Press CMD.
Doors
-
Doors: Press the select key or area for the desired setting when SETTING: LOCK UNLOCK displays
-
Garage Doors: Press the select key or area for the desired setting when SETTING: OPEN CLOSE displays.
Thermostats
Press the select key or area for the desired setting when SETTING: OFF CL HT displays.
Off
-
Select OFF to display FAN SETTING:.
-
Press any select key or area. When ON AUTO displays, press the select key for the desired option.
Cool
-
Select CL, then press any select key or area.
-
Enter the new temperature and press CMD.
Heat
-
Select HT, then press any select key or area.
-
Enter the new temperature and press CMD.
Appliances (7-Inch Only)
Use the multilevel slider on the right side of the device to set the device at 0, 25, 50, 75, or 100. 0 is Off and 100 is On.
Remove Devices in a Favorite
-
Press CMD until MENU? NO YES displays.
-
Select YES.
-
Enter your user code and press CMD.
-
Press CMD until ZWAVE SETUP? displays.
-
Press any select key or area. The keypad displays ADD LIST REMOVE. Press CMD to display FAV XFER OPT.
-
Select FAV. At FAVORITE NUMBER:, enter a number between 1 and 20 and press CMD. ADD EDIT REMOVE displays.
-
Select REMOVE then press CMD to view your devices.
-
When the desired device displays, press any select key or area to remove that device.
-
When REMOVE DEVICE FROM FAV? NO YES displays, select YES.
System Wi-Fi Setup
Use this function if your system is connected through Wi-Fi.
Use WPS to Connect Your System
-
Press CMD until MENU? NO YES displays.
-
Select YES.
-
Enter your user code and press CMD.
-
Press CMD until WIFI SETUP? displays.
-
Press any select key or area and the keypad displays WPS LIST MANUAL.
-
Press the WPS button on your Wi-Fi router.
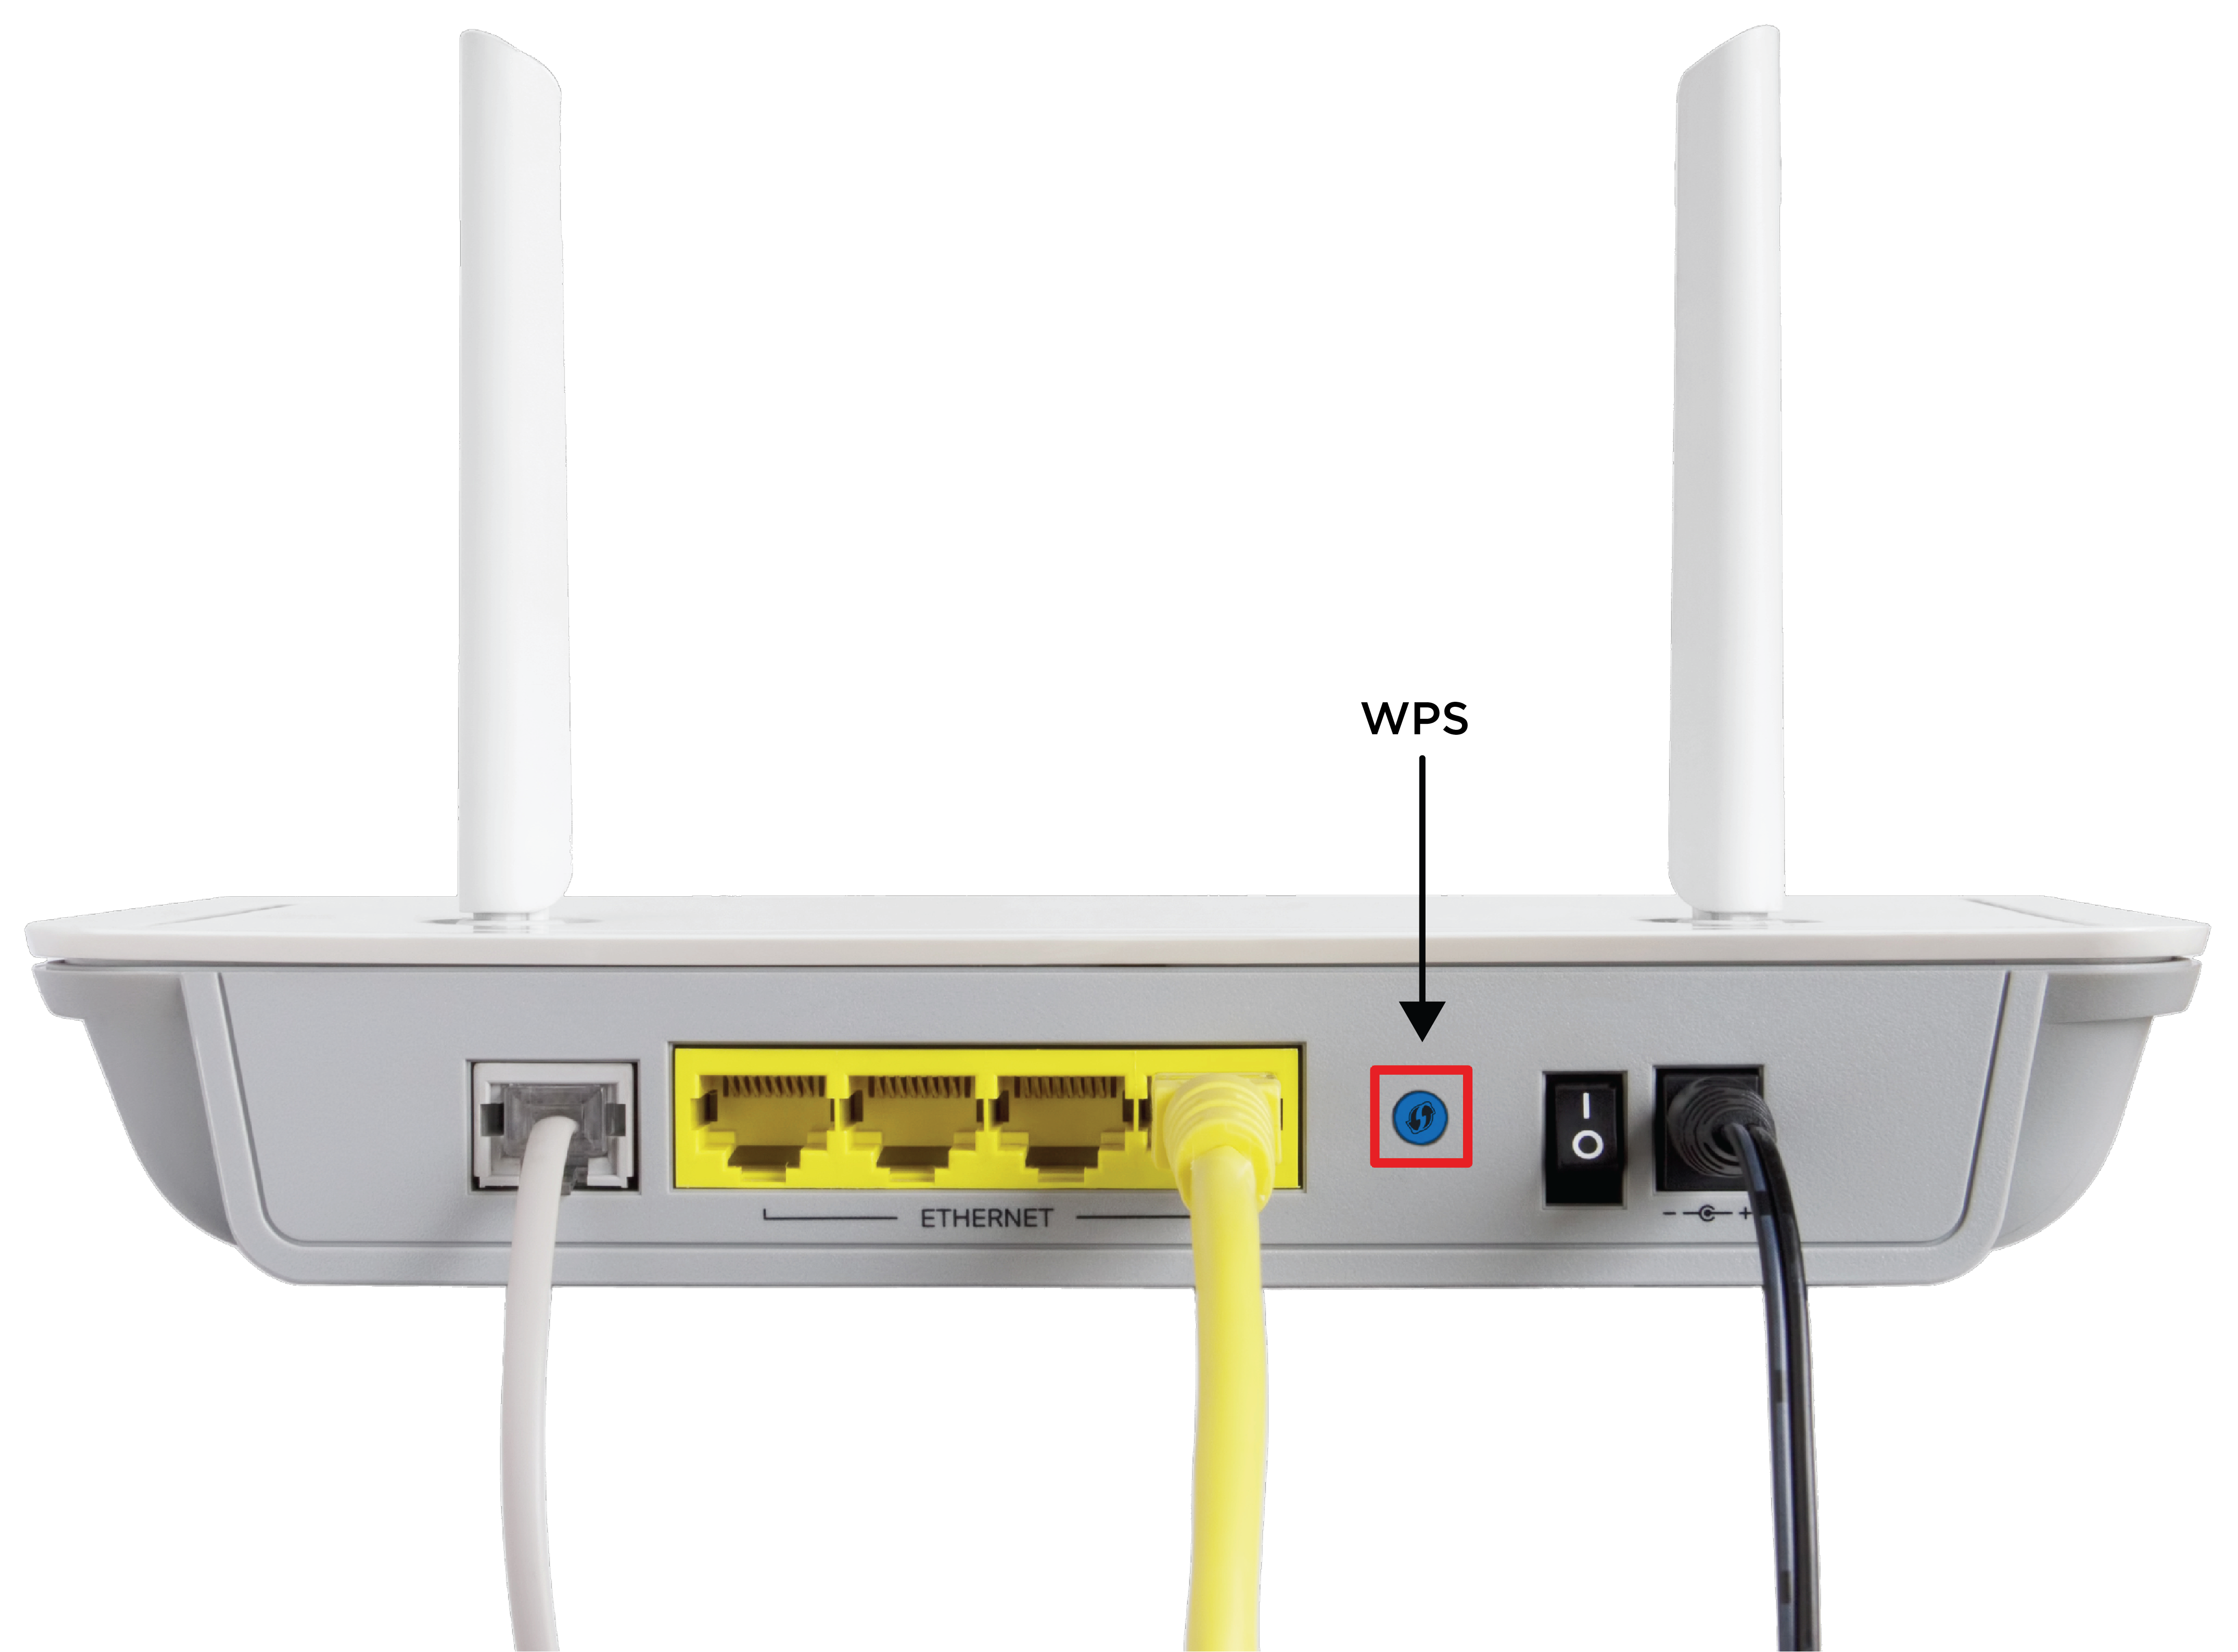
-
Select WPS on your keypad. SEARCHING displays.
-
When WPS is successful, CONNECTED displays on your keypad.
-
If WPS was not successful, WPS FAILED RETRY? NO YES displays. Select YES to retry. Press NO to display WPS LIST MANUAL.
List the Available Networks
-
Press CMD until MENU? NO YES displays.
-
Select YES.
-
Enter your user code and press CMD.
-
Press CMD until WIFI SETUP? displays.
-
Press any select key or area and the keypad displays WPS LIST MANUAL.
-
Select LIST. SEARCHING displays.
-
Press CMD to view the available Wi-Fi networks.
-
When the desired network displays, press any select key or area to connect.
W/L KEY:**************** displays. -
Select the desired security type and enter your network password. See Type On Your Keypad.
-
If the system is unable to detect the security type, press any select key or area on the keypad. WEP WPA NONE displays.
Manually Connect Your System
-
Press CMD until MENU? NO YES displays.
-
Select YES.
-
Enter your user code and press CMD.
-
Press CMD until WIFI SETUP? displays.
-
Press any select key or area and the keypad displays WPS LIST MANUAL.
-
Select MANUAL.
-
Enter the name of your Wi-Fi network and press CMD. W/L KEY:**************** displays.
-
Select the desired security type then enter your network password. See Type On Your Keypad.
-
If the system is unable to detect the security type, press any select key or area on the keypad. WEP WPA NONE displays.
Test the Network Connection
-
Press CMD until MENU? NO YES displays.
-
Select YES.
-
Enter your user code and press CMD.
-
Press CMD until WIFI SETUP? displays.
-
Press any select key or area and the keypad displays WPS LIST MANUAL. Press CMD to display TEST.
-
Select TEST. When the test is successful, CONNECTED displays. If the test is unsuccessful, NOT CONNECTED displays.
Zone Status
Zone status allows you to check the status of each zone, displaying a list of armed, bypassed, and alarmed zones.
Check Zone Status
-
Press CMD until MENU? NO YES displays.
-
Select YES.
-
Enter your user code and press CMD.
-
Press CMD until ZONE STATUS? displays.
-
Press any select key or area to display ARM BYPS ALR NBR.
-
Select ARM for a list of currently armed zones.
-
Select BYPS for a list of currently bypassed zones.
-
Select ALR for a list of currently alarmed zones.
-
Select NBR to find a specific zone number.
-
-
Select the desired option and the zones related to that option display with a zone status of OKAY, BYPS, or BAD.
Bypass Zones
Follow these steps to bypass a zone from the User Menu. Fire, panic, emergency, supervisory, and 24-hour zones cannot be bypassed.
-
Press CMD until MENU? NO YES displays.
-
Select YES.
-
Enter your user code and press CMD.
-
Press CMD until BYPASS ZONES? displays.
-
Press any select key or area. The keypad displays ZONE: - RST BYPS.
-
To bypass a zone, enter the zone number and select BYPS. The zone number automatically disappears and a new zone number can be entered. Refer back to step 3. Confirmation will be given when the zone has been bypassed.
-
To restore a zone, enter the zone number and select RST. Confirmation will be given when the zone is restored.
Note: Bypass can be accessed through the Carousel menu on Touchscreen Series Keypads.
Zone Monitor
If a door or window is opened when the system is disarmed, the keypad sounds a chime and displays the zone on the keypad.
Activate Zone Monitor
-
Press CMD until MENU? NO YES displays.
-
Select YES.
-
Enter your user code and press CMD.
-
Press CMD until ZONE MONITOR? displays.
-
Press any select key or area and the keypad displays ALL NBR or PERIM ALL NBR. Select the desired option.
-
Select ALL to add or remove devices from zone monitor.
-
Select NBR to enter a specific zone number.
-
Select PERIM to monitor all Night and Exit zones.
-
System Status
This option allows you to check the current status of your system.
Check Your System’s Status
-
Press CMD until MENU? NO YES displays.
-
Select YES.
-
Enter your user code and press CMD.
-
Press CMD until SYSTEM STATUS? displays.
-
Press any select key or area. Press CMD to advance through the system status list. If TRBL displays, call your service department for assistance.
System Test
Test Your System
-
Press CMD until MENU? NO YES displays.
-
Select YES.
-
Enter your user code and press CMD.
-
Press CMD until SYSTEM TEST? displays and press any select key or area.
-
At SYSTEM ZONES, select SYSTEM. The system test automatically begins.
Test Your Zones
Burglary Zones
-
Press CMD until MENU? NO YES displays.
-
Select YES.
-
Enter your user code and press CMD.
-
Press CMD until SYSTEM TEST? displays and press any select key or area.
-
At SYSTEM ZONES, select ZONES. The keypad displays BURG.
-
Select BURG and manually trip each burglary zone.
-
Select END to stop the test. BURG TEST OKAY displays when the test is complete and all zones tested okay.
Panic Zones
-
Press CMD until MENU? NO YES displays.
-
Select YES.
-
Enter your user code and press CMD.
-
Press CMD until SYSTEM TEST? displays and press any select key or area.
-
At SYSTEM ZONES, select ZONES. The keypad displays BURG PANICS.
-
Select PANICS and the manually trip each burglary zone.
-
Select END to stop the test. PANIC TEST OKAY displays when the test is complete and all zones tested okay.
User Groups
Groups define the authorities for each user code in the system. Each user can be assigned up to four groups. Ensure at least one administrator on your system has a group assigned with all authorities and all areas. Refer to User Groups for information on how to create a user group.
Time
Adjust the Time and Date on Your Keypad
-
Press CMD until MENU? NO YES displays.
-
Select YES.
-
Enter your user code and press CMD.
-
Press CMD until TIME? displays. Press any select key or area.
-
The keypad displays the current day and time. Press CMD.
-
The keypad displays the current date. Press CMD.
-
At TIME DAY DATE, select TIME to change the time. The keypad displays -: AM PM. Enter the current time and select AM or PM. Enter the time using a 12-hour clock. Press CMD.
-
Select DAY to change the day of the week. Press CMD.
-
Select DATE to change the date. Press CMD.
-
At MONTH:-, enter up to 2 digits for the month and press CMD.
-
At DAY:-, enter up to 2 digits for the day and press CMD.
-
At YEAR:-, enter up to 2 digits for the year and press CMD.
Display Events
The system memory holds a maximum of 1,000 events that occurred over the last 45 days. Events older than 45 days are automatically deleted.
View Invalid Code Reporting with Easy Enroll
-
Press CMD until MENU? NO YES displays.
-
Select YES.
-
Enter your user code and press CMD.
-
Press CMD until DISPLAY EVENTS? displays.
-
Press any select key. The keypad displays DISPLAY EVENTS? FRST LST SRT.
-
FRST: View the oldest to newest events.
-
LST: View the newest to oldest events.
-
SRT: Sort through the events log.
-
-
The keypad displays the user code connected to that event and displays ADD CODE? NO YES.
-
Select YES and the keypad displays USER CODES? Select NO to exit the User Menu.
-
Enter an available user number or press the fourth select key or area to automatically assign a user number. Press CMD.
-
Press any top row select key or area to clear the default name and enter a new name.
-
Enter a GROUP NO:. The keypad displays USER ADDED.
Service Request
-
Press CMD until MENU? NO YES displays.
-
Select YES.
-
Enter your user code and press CMD.
-
Press CMD until SERVICE REQUEST? displays, then press any select key or area.
-
When REQUEST MADE displays, the request was successful.
Fire Drill
Fire Drill tests your system’s bells and sirens and does not send a message to your monitoring station.
Start a Fire Drill Test
-
Press CMD until MENU? NO YES displays.
-
Select YES.
-
Enter your user code and press CMD.
-
Press CMD until FIRE DRILL? displays, then press any select key or area.
-
Select YES to start the test. Enter your user code and press CMD to end the test.
Service User
The Service User is User 0. The Service User’s code is the default 4-digit user code printed on the system box. If the panel has been initialized, the default user code becomes 99.
You can choose whether anyone can access the PROGRAMMER and DIAGNOSTICS menus, and whether the Service User can perform system actions, such as arming, disarming, accessing the User Menu, and more.
Complete the following steps to allow access by default or block access for extra security:
-
Press CMD until MENU? NO YES displays. Select YES.
-
Enter any code that is not the Service User code, then press CMD.
-
Press CMD until SERVICE USER? NO YES displays. The default option is YES. Press CMD or press the third row select key or area to choose NO.
Select NO only if you want to block the Service User from performing any system actions and prevent anyone from accessing the PROGRAMMER and DIAGNOSTICS menus.
Note: If NO is selected, NO AUTHOIRTY displays when anyone tries to access the PROGRAMMER or DIAGNOSTICS menus. To allow access again, set the Service User feature in the User Menu to YES.
-
Press CMD to confirm your choice.